1. KVM Installation and Requirements
KVM is a full virtualization
solution for x86 processors supporting hardware virtualization (Intel VT or
AMD-V). It consists of two main components: A set of Kernel modules (kvm.ko,
kvm-intel.ko, and kvm-amd.ko) providing the core virtualization infrastructure
and processor specific drivers and a userspace program (qemu-kvm) that provides
emulation for virtual devices and control mechanisms to manage VM Guests
(virtual machines).
VM Guests (virtual machines),
virtual storage and networks can be managed with libvirt-based and QEMU tools. libvirt is a library that provides an
API to manage VM Guests based on different virtualization solutions, among them
KVM and Xen. It offers a graphical user interface as well as a command line
program. The QEMU tools are KVM/QEMU specific and are only available for the
command line.
1.4. Installing KVM
You can select virtualization packages to be installed during RHEL installation by going in the “customize now” option and then selecting “virtualization” option and selecting all the options in it.
Or you can
install it by following the procedure:
# yum install kvm python-virtinst libvirt libvirt-python
virt-manager \
virt-viewer
libguestfs-tools
After installation go to under Application ->
system tools -> Virtual Machine Manager.
1.5 Disk Space
Verify
you have enough disk space on the host. KVM creates image files (which look
just like regular files in the file system) for each VM and assumes you are
going to place them in directory /var/lib/libvirt/images.
2. KVM Limitations
2.1. General Limitations
The following general restrictions
apply when using KVM:
MAC addresses:
If no MAC address is specified for a NIC, a default MAC
address will be assigned. This may result in network problems when more than
one NIC receives the same MAC address. It is recommended to always assure a
unique MAC address has been assigned for each NIC.
Live Migration:
Live Migration is only possible between VM Host Servers
with the same CPU features and no physical devices passed from host to guest.
Guest storage has to be accessible from both VM Host Servers and guest
definitions need to be compatible. VM Host Server and VM Guests need to have
proper timekeeping installed.
User Permissions:
The management tools (Virtual Machine Manager, virsh,
vm-install) need to authenticate with
libvirt. In order to invoke qemu-kvm
from the command line, a user has to be a member of the group kvm.
Suspending/Hibernating
the VM Host Server:
Suspending or hibernating the VM Host Server system
while guests are running is not supported.
3. KVM Support Status
3.1. Supported Features and Tools
vm-install:
Define and install VM Guests via vm-install
including specifying the number of virtual processors, RAM, disk type and
location, video type, keyboard mapping, NIC type, binding, MAC address, and
boot method.
Restrictions: Currently only
the
raw, qcow2 and qed disk formats are supported. NIC creation is
restricted to using Realtek, e1000 or virtio NICs.
Virtual Machine Manager:
Manage guests via Virtual Machine Manager using the
following functions: autostart, start, stop, restart, pause, unpause, save,
restore, clone, migrate, special key sequence insertion, guest console viewers,
performance monitoring, and CPU pinning. Furthermore, static modifications of
CPU, RAM, boot method, disk, NIC, mouse, display, video and host PCI and USB
assignments are supported.
Restrictions: The following
features are currently not supported: sound devices, qxl, vmvga (vmware), Xen
video, emulated SCSI and SATA disks, vmdk storage format, Spice graphics,
eepro100, ne2k_pci, pcnet, Smartcard and USB redirection.
virsh
Manage guests via the command line.
Restrictions: Requires XML
descriptions as created by vm-install or virt-manager.
Altering these descriptions via virsh edit is not supported.
The supported virsh functionality is restricted to life cycle
functions.
qemu-kvm
Manage guests via the command line. Although managing
via Virtual Machine Manager should be the preferred option, qemu-kvm
may be used for greater flexibility.
kvm_stat
Debugging and monitoring tool.
USB Host Device
Pass-through:
A physical USB device may be passed from the VM Host
Server to the VM Guest.
5.2. Changing a VM Guest's State with virsh
In the following examples the state
of a VM Guest named “sles11” is changed.
Start
virsh -c qemu:///system start sles11
Pause
virsh -c qemu:///system suspend sles11
Reboot
virsh -c qemu:///system reboot sles11
Graceful shutdown
virsh -c qemu:///system shutdown sles11
Force shutdown
virsh -c qemu:///system destroy sles11
Turn on autostart
virsh -c qemu:///system autostart sles11
Turn off autostart
virsh -c qemu:///system autostart --disable sles11
7.2. Configuring Remote Connections
A major benefit of
libvirt is the ability to manage VM
Guests on different remote hosts from a central location. This section gives
detailed instructions on how to configure server and client to allow remote
connections.
Remote Tunnel over SSH
(qemu+ssh)
Enabling a remote connection that
is tunneled over SSH on the VM Host Server only requires the ability to accept
SSH connections. Make sure the SSH daemon is started (rcsshd status)
and that the ports for service
SSH
are opened in the firewall.
User authentication for SSH
connections can be done using traditional file user/group ownership and
permissions. Connecting as user
root
(qemu+ssh://root@mercury.example.com/system)
works out of the box and does not require additional configuration on the libvirt side. 7.3. Connecting to a VM Host Server
In order to connect to a hypervisor withlibvirt, you need to specify a uniform resource identifier (URI). This URI is needed with virsh and virt-viewer (except when working asrooton the VM Host Server) and is optional for the Virtual Machine Manager. Although the latter can be called with a connection parameter (for example, virt-manager -c qemu:///system), it also offers a graphical interface to create connection URIs.
Example Hypervisor
Connection URIs
test:///default
Connect to the local dummy hypervisor. Useful for
testing.
qemu:///system
Connect to the QEMU hypervisor on the local host having
full access (type system). This usually requires that the command is issued by
the user
root. qemu+ssh://tux@mercury.example.com/system
Connect to the QEMU hypervisor on the remote host
mercury.example.com. The connection is established via an SSH tunnel.
qemu+tls://saturn.example.com/system
Connect to the QEMU hypervisor on the remote host
mercury.example.com. The connection is established TLS/SSL.
Some features:
1. Monitoring and Migrating the VM from 1 Host to another host.

In the starting, on localhost, 2
VMs are running rhel6.2 and win2008.
To view another systems running
and not running VMs, you first need to add the system you want to monitor and
which is in your network.
To do this, go to File option and
select “add connection” option.
Now a “add conection” window will
be opened.

Click on “Connect to remote host”
Method SSH
Give username which is by default
“root”
And give hostname. Here you can
also give the IP address of the system too.
Now click on “connect”.
Now in the “Virtual Machine
Manager” window it will show “192.168.1.20(QEMU) – Connecting”.
Now it will show a message “the
authenticity of host '192.168.1.20' cant be established.
RSA key fingerprint is xx.xx.xx.xx.xx.xx.x.x.x.x.x.x.x.x.x.
are u sure u want to cont.
connecting (yes/no) ?”
Type “yes” here.
Next window will be: openssh
screen.
Now it will ask you the root
password.
Type root password here.
root@192.168.1.20's password: redhat
And click OK.


After few moments, it will start
showing second machines VMs.

Now it is showing all 3 VMs on
the second system 192.168.1.20.
Here now you can also migrate any
VM running on this machine to another machine in the network.
Just click on any VM.
Right click on it.
Click on “Migrate”.


Now it will ask you to specify the New Host on which you want to migrate the VM.
In this scenario, I am migrating the VM from 192.168.1.20(prakash.taashee.com) to 192.168.1.31(localhost) system.
Click on migrate.
Now it would migrate on the required system.
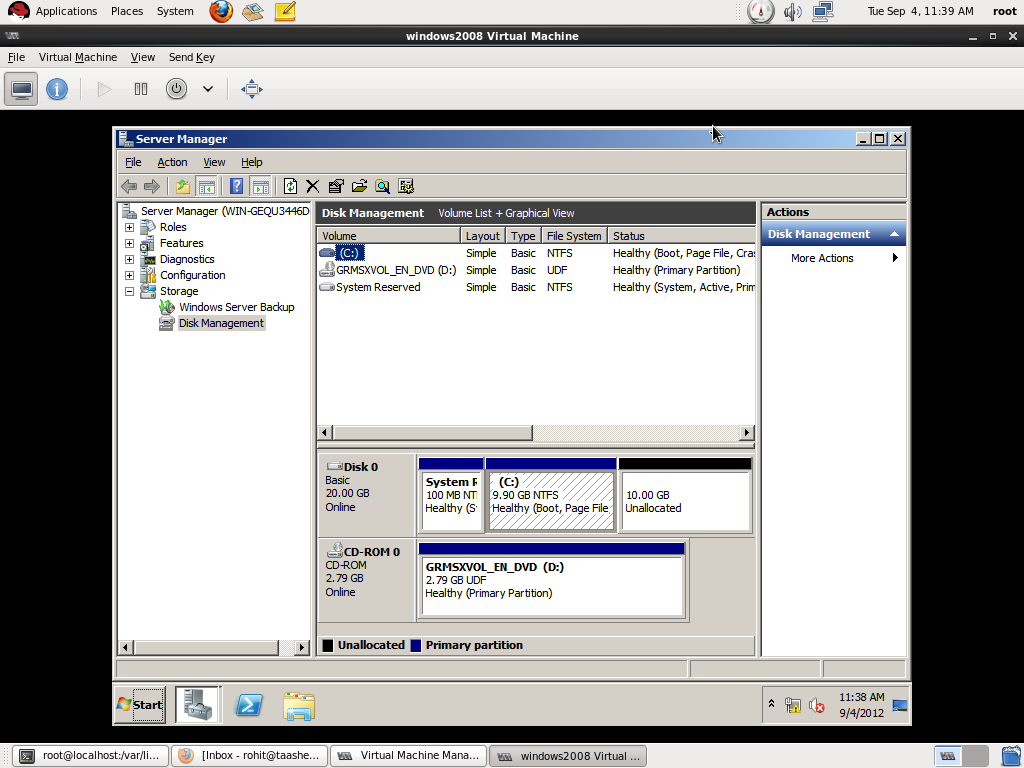
2. Adding storage in a VM:
This is the fresh installed windows machine image.

The Disk Management window is like this:

Check its storage details. It is showing the C-drive of 9.90 GB.
Lets say, you want to add 10GB more to it.
Note: Make sure the VM is in shutoff mode.
To do this, on the local system you need to run a command.
# qemu-img resize windows.img +10GB
It will instantly show the message “Image resized”.
This 10GB size has been added in the windows and will be
shown as the “Un allocated partition”.
Now if you want, you can create a whole new drive of this unallocated partition.

And you can add this free space in your C-drive.
For this right click on C-drive and click “extend” option.
Finally, 10GB space would be added to it and it would look like this:

No comments:
Post a Comment